


Adobe Dreamweaver has done well to stay relevant in a world full of drag-and-drop website builders. This software is a great choice for web designers and developers because it has a lot of useful tools and features. But how do you use Dreamweaver to build your first site?


How to Design a Website from Scratch with Dreamweaver
Before you can use Adobe Dreamweaver, you need to buy it, but you can try it out for free first.
To get started, go to the Adobe website, sign in or create an account, and then download the Adobe Creative Cloud tool. From here, you can download Adobe Dreamweaver and start with the full guide. This guide will show you how to use Dreamweaver website designing template files to design a website from scratch.
Step 1: Make a site in Dreamweaver
Open Adobe Dreamweaver and go to the top of the page to find the Site menu. Choose “New Site,” then give your site a name and decide where its files will go.
Also Read: Explore These Adventurous Things in Australia
Step 2: Create a Template File
Next, you need to make a website designing template to design a website from scratch. The themes that CMS systems like WordPress and Shopify use are template files, but you make them yourself.
Click “New” or “File” > “New,” and then choose “HTML Template” from the list of “Document Types.” This will make a simple template that already has some HTML in it. You will need this HTML for your project, so keep it in place for the next steps.
Step 3: Add a header to the template
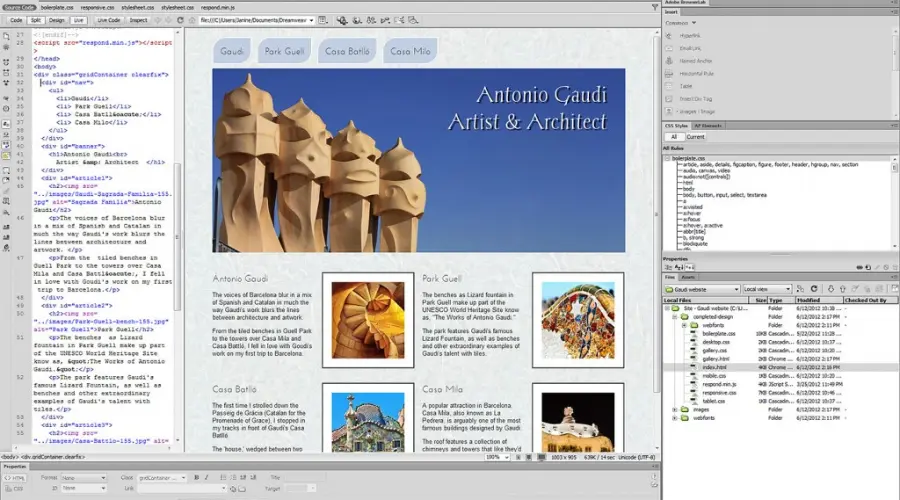
Now it’s time to put together the website’s menu and header using the template you just made.Go to the top of the screen, where it says Insert, and choose Header from the list.
At this point, a talk will start. Give your new header’s class a name, and then click OK to add the code to your HTML. It should put the new code between the body> and /body> tags automatically, but you can move it if you need to.
After this, you should also add a div element for the site’s logo and a nav element for the site’s menu. Select Div from the Insert menu, then go back to the Insert menu and choose Nav. These two things each need their class name. As the last step in this process, we gave our navigation element some menu options. To do this, choose Hyperlink from the Insert menu. If you haven’t made the pages that will have links in the header yet, leave the href property blank until you do.
Step 4: Add a CSS style sheet
As you can see, with the previous steps website starts to look pretty bad right now. This problem can be fixed with a little CSS, and adding a stylesheet is easy in Dreamweaver. On the right side of the screen, click the plus sign next to Sources in the CSS Designer. You only have to give your stylesheet a name. The rest of the settings can stay the same.
First, you need to change the header into a flexbox. Flexbox is just one way that CSS can be used to lay out a website. Along with this, the site’s font is set, it has a black background, and several other changes have been made to make it look better. At the end of the article, you can find the full CSS code.
Step 5: Add areas to the template that can be changed
Editable regions make sections of HTML that can be changed when the website designing template is used to make other pages. This is a great place for the information on our main page. To add an editable area to your page, go to Insert > Template > Editable Region.
Step 6: Fill the template with text and images
You don’t need to add any more HTML to use the editable area you just added, but you can still add some when you make individual pages. To add a new div element to your website, go to Insert and choose Div. This will hold the text on the page and give you a place to put a background image. This element has a class and an ID so that different pages can have different CSS properties. If you want to take your Dreamweaver website to the next level, these unique CSS background patterns are great.
Step 7: Use the template to add pages
Since you already have designed a template, you can start adding pages. Go to File > New and under Document Type, choose HTML. Before you click “Create,” give each page you add a title.
The new page is white, and the template hasn’t been added to it yet. Go to Tools > Templates and click on Apply Template to Page once your new page is open in Dreamweaver. Choose the template you want from the list, then click Select to load it. Last, click File > Save As and give your new page a name before saving it. Continue doing this until you have as many pages as you need. You don’t have to use just one website designing template; you can add more to make different page layouts.
Step 8: Link the pages on the template
Once you’ve added your pages, you can change the navigation links in your template so that they lead to the right pages. Go back to your template and look for the A tags that you just added. Remove the placeholder link and click on the quotation marks to open the Browse menu.
You can choose the right page for each of your links from this page.
Step 9: Fix new pages’ CSS and HTML
At the moment, all of the pages will look the same. Follow the steps below to finish up your new website and make sure that each page has its content. Change the ID of each page’s content div element to match the page title. Add CSS code for a different background image to the new element ID.
Step 10: Check the website in your browser
You can use the web browser of your choice to test your new website right from Adobe Dreamweaver. Go to File > Real-Time Preview and choose the browser you want to use to view your website. This is a great way to test CSS and other code that may not work in all browsers.
Now all you need is a place to put your website. A great place to start is by using AWS S3 to host a site that doesn’t change.
Conclusion
Dreamweaver might not look as easy to use as WordPress or Squarespace, but it gives you a lot more power. This guide is a good place to start, but there is a lot more to learn, and you should look into Dreamweaver on your own. Feedhour has a website where you can find out more about how to design a website from scratch.
FAQ’s
Source1 Source2 Source3 Source4 Source5 Source6 Source7 Source8


