


It has been more than a decade since Adobe InDesign joined the publishing field, and it is not difficult to think that InDesign has led the markets since its inception. Uses of Adobe InDesign is a superior and more comprehensive version of Adobe’s prior competitor, Pagemaker. However, the latter moved publishing to the next level by offering features, tools, and enhancements that increased the value of the publishing industry.
InDesign is comprehensive software designed to meet the design needs of the Multimedia Industry. Generally uses of Adobe Indesign happens in various industries like newspapers, books, newsletters, magazines, ads, and the finest for the publishing sector. The program has made great strides in recent editions to accommodate layouts for new-generation technology such as smartphones, tablets, and iPads. We hope that this article, “A Beginner’s Guide to InDesign,” will give advanced knowledge on the Adobe InDesign program and uses of Adobe Indesign.
What are the various uses of Adobe InDesign
Uses of Adobe Indesign templates, You can make things like stationery, resumes, pamphlets, annual reports, catalogs, interactive digital publications, EPUBs, books, magazines, and more.
Creating a New Document and Print Setting
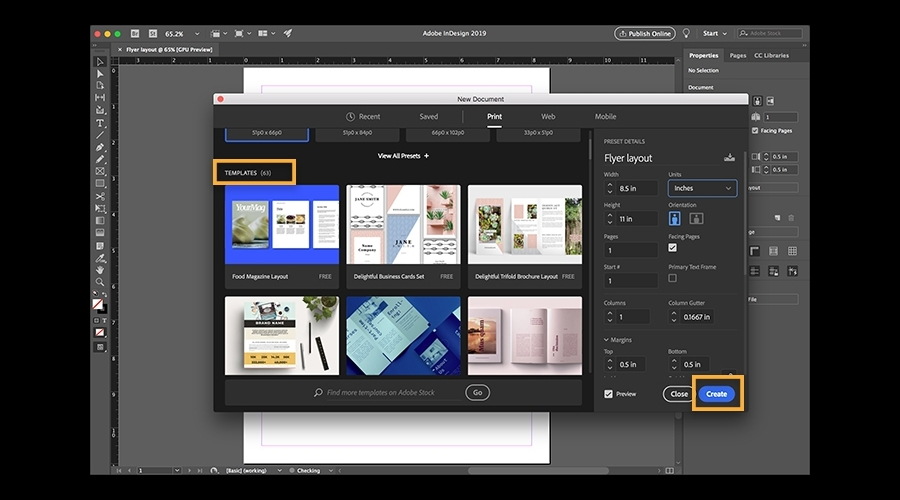
Open Adobe InDesign to start a new document. The introduction box appears as soon as the software is loaded, allowing you to view existing or previously closed files. However, you may create new documents from the bottom left of the window and access Adobe’s help materials.
By default, creating a new document to meet our print requirements is impossible. Thus, it would be best if you worked around this. InDesign allows you to work in points, millimeters, inches, and other units as needed. In this scenario, I’d want to work in inches and create the paperwork accordingly.
- Edit > Preferences > Units & Increments
- Under Units & Increments – Select Rulers and Units – Change the Horizontal and Vertical fields as per your requirement. Here, I am changing them into Inches.
You may now begin generating a new document in one of two ways.
- You may access the shortcut keys by pressing Ctrl+N.
- On the ID Introduction window, click the Document link.
Because we previously made changes to the document, the units will be in inches in the window.
Types of Layers
You will only be able to grasp Adobe InDesign if you comprehend the functioning of Adobe’s most renowned Layers panel. Adobe InDesign Layers palettes are introduced with functional enhancements in recent versions, derived mainly from the Vector product Adobe Illustrator. If you have prior experience with Illustrator, it will undoubtedly aid you in understanding the component.
Open a previously saved Indesign document. To access the Layers palette, click the Layers button.
Click F7 or Window > Layers
The layers palette appears, and the drop-down arrow on layer 1 is visible. When you click the hand, the layers palette opens, revealing arrays of sub-layers predefined with individual items such as text, shapes, and imported graphics.
Change Layer Name
To modify the name of the layer, double-click on its current name. The cursor arrow transforms into a finger cursor, highlighting the text in blue. Fill in the word you wish to give to the layer.
Lock the Layer
The lock and visibility symbols are grouped directly before the layers palette, like in every other Adobe layer. You may activate the layers lock by clicking on the lock icon, preventing you from disturbing the contents of the layers. You may also conceal the content of the layers by deactivating the eye sign and setting.
Group Layer
If you wish to organize the material into two or more levels, arrange the needed layers and create a group. It enables you to move, conceal, and lock a group of layers together, saving you time while working on them. Adobe InDesign will automatically name Group Group1 and Group2. You can rename groups in the same manner as described in the Layers column.
Rulers and Guidelines
Precision excellence is vital in all aspects of the Designing world. When it comes to publishing, the demand is more significant. And the easiest method to accomplish this is to use Rulers and Guides to perfectly align the parts in your design. Creating Rulers and guides in your design is one of the best uses of Adobe indesign.
Turn Ruler On and Off
InDesign opens a document with rulers enabled by default. However, working with rulers can be challenging and unnecessary when not working with them. The following methods are available for turning rulers on and off.
Using the Ctrl + R key, you may toggle between Rulers on and off.
You may do the same manually by going to
View > Show Rulers.
View > Hide Rulers
Change Units
It is critical to modify the units of your ruler according to your needs, mainly if you operate in print or publishing.
To modify the rulers’ units, use one of the techniques listed below.
It will open the Preferences window. Change the Horizontal and Vertical units under Ruler Units.
Right-click on the ruler’s bar to open a pop-up window with a list of the units stated. Change the rulers as needed by clicking on the necessary team. Change the value of the horizontal and vertical rulers separately, as altering the value of one does not affect the other.
Edit > Preferences > Units & Increments >
Zero Point
The 0 points on the ruler are set to the top left corner of the document by default. Adobe InDesign sees your page begin at the top left corner, where the ruler should start counting the width and height.
If you wish to specify where to begin counting the documents, use the techniques listed below. Drag the rulers to where the units start by clicking on the top left corner where the horizontal and vertical rulers intersect.
Guides
If you are familiar with Photoshop or Illustrator, there isn’t much to learn about the Guidelines, as they function similarly in every product. Guidelines are there to align things in your work area accurately. Text, objects, and other elements can be fixed and positioned evenly using procedures while retaining design coherence.
To display the guidelines, click on the ruler and drag it to the desired location. A horizontal ruler broadcasts a flat policy, whereas a vertical ruler broadcasts a vertical approach.
Conclusion
Adobe InDesign is a comprehensive software with many practical aspects that you may utilize at any time. Defining and fitting the finest tools in a single post is impossible. It attempts to provide the core knowledge that any newcomer needs to get started. We hope you found the post helpful and will begin your InDesign work with the abovementioned tools. Moreover, you can check the official Feedhour website for more information related to the uses of adobe Indesign.


